How to connect linux server via putty
Table of Contents
connect linux server via putty – Dealing with servers could be quite a complex task, and we are not even talking about being a server administrator. Something as simple as just connecting to a remote server could be difficult for complete beginners. While servers running Windows Server OS could be remotely controlled using Microsoft’s proprietary remote desktop protocol, the majority of the servers on the entire world wide web run on Linux distributions.
Connecting to a Linux server or VPS is not something that requires a lot of technical knowledge; however, it is not as self-explanatory as connecting their Windows counterparts. Therefore, without someone showing how to accomplish it, most novice users will see it as a roadblock. This article is intended to help you figure out how to connect to your remote Linux server or VPS, however, let us cover some bases first.

connect linux server via putty
VPS stands for a virtual private server. It is a service provided by web hosts that splits up a bare-metal server into smaller virtual machines. These VMs are then connect linux server via putty rented out for a fraction of the price of a dedicated server and each one acts as a standalone server with its own operating system and dedicated resources.
A Linux VPS, as you might have already guessed by now, is just a virtual private server that is running a Linux distribution such as Debian, Ubuntu, CentOS, RHEL, etc.
What is SSH?

SSH (i.e., Secure Shell) is a very secure and powerful network protocol that allows users to directly access the command line of a Linux server. This will give you the ability to execute Linux commands that control your VPS server and manipulate files & applications from the comfort of your home (or office). By default, the secure shell uses port 22. We do, however, recommend that you change the port for security purposes as in case of an attack, this is the first port that potential hackers will try.
SSH is already automatically built-in to macOS and Linux operating systems but not into Windows. Therefore, you must first install an SSH client such as PuTTY before attempting to connect to a Linux server from a Windows system. In fact, PuTTY is the SSH client we are using for this article and we recommend you do the same.
What is PuTTY?
PuTTY is a free software application for Microsoft Windows operating systems that can be used to make an SSH connection to your server. PuTTY is an SSH and telnet client, developed originally by Simon Tatham for the Windows platform. PuTTY is open-source software that is developed and supported by a group of volunteers.
How to open a Putty session and exit a session
Now let’s learn how to open PuTTY, configure the server connection settings for SSH, and launch the command line
1) Double click the PuTTY icon to launch it

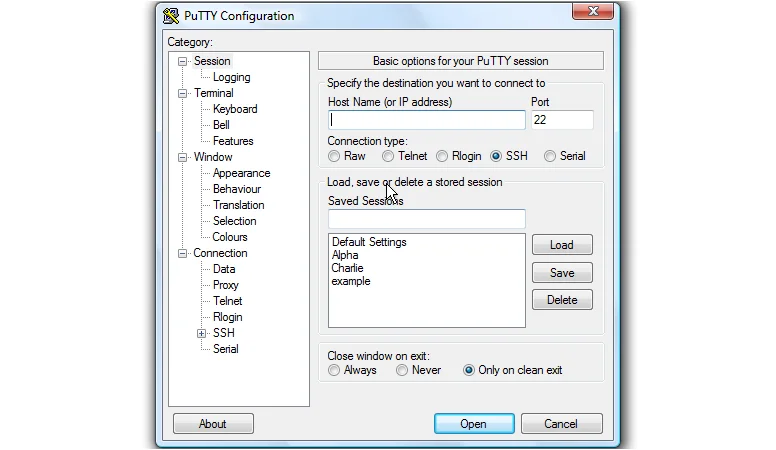
This is the PuTTY default screen. This tutorial will show how to enter your connection settings to connect via SSH with Port 22.

2) Enter the main server IP into the Host Name field.
The Port number is shown here
3) Select the connection type here
4) Then click Open
This is the PuTTY command line. Before you begin, you will need to log into the server
5) Type your username here, then press
6) Next, type in your password, or right-click to paste it
You are now logged into your server via SSH with PuTTY. You can view what IP last logged in, and on what date. From here you can run dozens of commands to manage your server.
7) To exit, simply type Exit here, then push …
8) Or simply close the window
This is the end of the tutorial. You now know how to log into your server using SSH with PuTTY
